Classic Tall Sponge Cake — Light, Airy & Elegant
Deprecated: preg_split(): Passing null to parameter #3 ($limit) of type int is deprecated in /home/seariivx/carwom.com/wp-content/themes/jannah/framework/functions/post-functions.php on line 863
Classic Tall Sponge Cake — Light, Airy & Elegant
Introduction
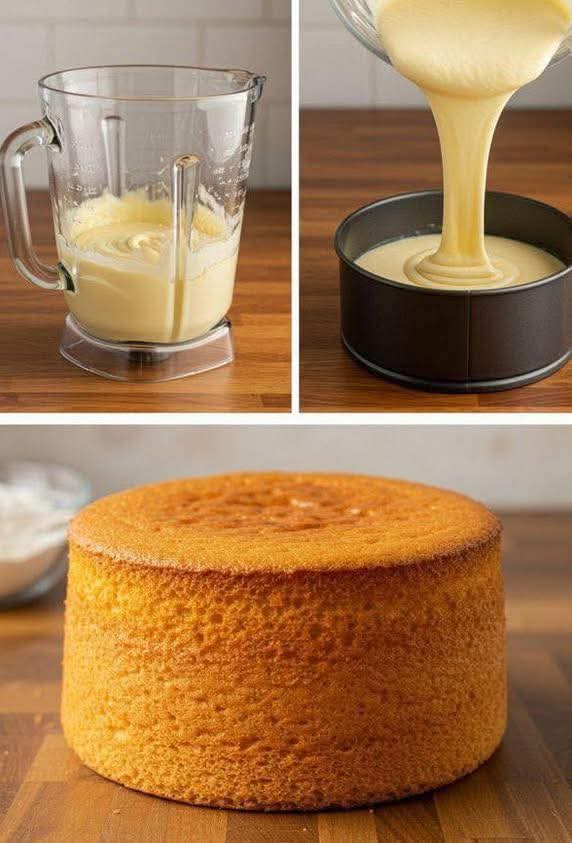
This classic sponge cake is airy, tender, and tall — the kind you see in patisseries and celebratory cakes. Made primarily from eggs, sugar, flour, and a touch of fat (or none, depending on style), the sponge relies on well-aerated eggs for lift rather than heavy leaveners. The result is a springy crumb that soaks up syrups and pairs beautifully with whipped cream, fruit, custard, or buttercream.
Shown in the photo: a high, evenly risen sponge — a great result from correct whipping, gentle folding, and careful baking.
Ingredients (Classic American Sponge / Genoise-style hybrid)
Dry
- 1 cup (120 g) all-purpose flour, sifted
- 2 tbsp (16 g) cornstarch (optional — for a lighter crumb)
- 1/4 tsp fine salt
Wet
- 5 large eggs, room temperature
- 1 cup (200 g) granulated sugar
- 2 tsp vanilla extract
- 3 tbsp (45 g) unsalted butter, melted and cooled (or 2 tbsp oil for a more tender crumb)
- 1–2 tbsp milk (only if batter seems too thick after folding)
Equipment & Pan
- 8-inch (20 cm) round high-sided cake pan (tube pan or deep cake ring gives a tall result). Alternatively, use two 8″ layer pans (bake slightly less time).
- Electric mixer (stand or hand), rubber spatula, sifter, and parchment paper.
History & Origins
Sponge-style cakes have ancient roots in European baking. Unlike butter cakes that use chemical leaveners, sponge and genoise cakes rely on whipped eggs to capture air and create rise. The genoise (Italy/France) and Victoria sponge (England) are close relatives. Over centuries, bakers refined whipping, folding, and baking to produce signature lightness — the same techniques used here.
Benefits (Why Make This Cake)
- Elegant texture — light, springy crumb ideal for layered cakes.
- Versatile — pairs with fruit, creams, syrups, or any filling.
- Relatively quick to prepare (about 30–40 minutes hands-on + baking).
- Minimal ingredients — pantry-friendly and budget-conscious.
Step-by-Step Instructions
Prepare
- Preheat the oven to 325°F (160°C) for tall pans (or 350°F / 175°C if using shallow layer pans). Position a rack in the lower third of the oven.
- Line the bottom of your pan with parchment. Do not grease the sides if you want the batter to cling and rise high; if using regular pans, grease and flour them lightly.
- Sift the flour (and cornstarch) with the salt twice and set aside.
Whip Eggs & Sugar
- In a large clean bowl, combine the eggs and sugar. Using an electric mixer, beat on medium-high until the mixture is thick, pale, and forms a ribbon when the beaters are lifted — about 8–12 minutes depending on mixer and egg temperature. This step is critical; it’s your only leavening.
- Mix in the vanilla extract during the last minute of whipping.
Fold in Dry Ingredients
- Gently fold one-quarter of the sifted flour into the whipped eggs to lighten the batter, using a rubber spatula. Use horizontal sweeping motions and avoid deflating the foam.
- Repeat in two or three additions until all flour is incorporated. Work quickly but gently — overmixing will deflate the batter.
Add Butter (Optional)
- If using butter for flavor and tenderness: temper 2–3 tablespoons of melted butter by stirring 1–2 tbsp of the whipped batter into the butter to equalize temperature, then fold the butter mixture gently into the batter.
- If the batter seems noticeably thick, fold in 1 tbsp milk at a time until it reaches a ribbon-like pourable consistency.
Transfer & Bake
- Pour batter into the prepared pan, smoothing gently. Tap the pan lightly on the counter to release large air pockets (don’t overdo this).
- Bake: for a tall 8″ deep pan expect 35–45 minutes at 325°F; for two 8″ layer pans bake ~20–28 minutes at 350°F. The cake is done when the top is golden, springs back lightly to the touch, and a skewer inserted in the center comes out clean.
Cool & Unmold
- Remove from oven and let cool in the pan for 8–10 minutes. If you used an ungreased high-sided pan (for maximum height), invert the pan onto a rack to cool upside down — this prevents collapse while cooling (common with angel-food style pans).
- For standard pans: run a knife around the edge and turn out onto a rack to cool completely before slicing or filling.
Methods & Variations
Classic Whipped-Egg Sponge (what we used)
Relies on thoroughly whipped eggs and sugar for volume. Gentle folding preserves air.
Genoise (Warm-Whip Technique)
Eggs and sugar are warmed over a bain-marie while whisking, then beaten to ribbon stage. This gives extra volume but requires attention to temperature.
Chiffon Variation
Add oil and baking powder; fold in whipped egg whites separately for an ultra-moist, tall cake that keeps longer.
Flavor Additions
- Zest of lemon or orange for bright notes.
- Almond extract (½ teaspoon) for a delicate nutty aroma.
- Folded in cocoa for a chocolate sponge (reduce flour slightly).
Formation — How the Texture and Flavor Are Built
The cake’s structure comes from air beaten into the eggs and trapped by the protein network as the batter bakes. Sugar stabilizes the foam and contributes tenderness and browning. If you add butter, it tenderizes and adds richness; if you omit it, you get a lighter, more traditional sponge. Gentle folding and low oven temperatures (for deep pans) help the interior set without cracking or collapsing.
For Lovers — Serving Ideas & Pairings
- Simple & Elegant: Serve thinly sliced with lightly sweetened whipped cream and fresh berries.
- Layer Cake: Slice horizontally into layers and fill with pastry cream, jam, or whipped cream and fruit.
- Tea-Time: Dust with powdered sugar and serve with Earl Grey or green tea.
- Decadent Option: Brush layers with simple syrup (1:1 sugar:water) flavored with vanilla or liqueur before spreading buttercream.
- Modern Twist: Top with mascarpone frosting and roasted stone fruit.
More Methods — Quick Reference
| Method | Key Steps | Result |
|---|---|---|
| Whip Eggs Cold | Whip eggs & sugar to ribbon | Light, airy sponge |
| Warm-Whip (Genoise) | Warm eggs & sugar then beat | Greater volume, slightly denser crumb |
| Chiffon | Add oil + bake with meringue | Moist, tender, tall |
Conclusion
A classic sponge cake is a baker’s showcase — it rewards technique and yields a beautifully light cake that adapts to many fillings and occasions. Whether you keep it simple with whipped cream and fruit or build an elaborate layered cake, mastering the sponge gives you a reliable base for elegant desserts.
Lovers — Who Will Adore This Cake
This cake is beloved by pastry purists, home bakers who appreciate technique, hosts who need a versatile showstopper, and anyone who prefers delicate, not-too-sweet desserts. It’s also great for special events, birthdays, and afternoon tea.
Practical Tips & Troubleshooting
- Egg temperature: Room-temperature eggs whip to greater volume; cold eggs take much longer.
- Clean tools: Use a spotless, grease-free bowl and beaters — fat inhibits foam formation.
- Don’t overfold: Stop folding as soon as flour disappears — some streaks are fine to preserve air.
- Bake gently: Avoid opening the oven early and keep even heat to prevent sinking.
- Cooling: For very tall sponges, invert the pan while cooling to avoid collapse (if pan design allows).
Final Thoughts
With practice, whipping and folding become intuitive. Start with this classic technique and soon you’ll be customizing flavors, building layered creations, and serving show-stopping sponge cakes with confidence.
Deprecated: preg_split(): Passing null to parameter #3 ($limit) of type int is deprecated in /home/seariivx/carwom.com/wp-content/themes/jannah/framework/functions/post-functions.php on line 863