Diabetic-Friendly No-Bake Creamy Cake
Deprecated: preg_split(): Passing null to parameter #3 ($limit) of type int is deprecated in /home/seariivx/carwom.com/wp-content/themes/jannah/framework/functions/post-functions.php on line 863
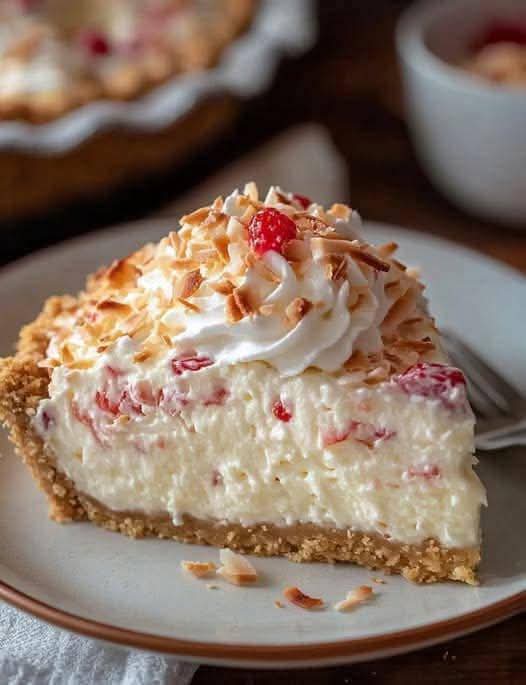
Diabetic-Friendly No-Bake Creamy Cake
If you’ve been searching for a decadent, creamy dessert that doesn’t send your blood sugar soaring, this Diabetic-Friendly No-Bake Creamy Cake is your dream come true. This cake is the perfect combination of indulgence and health — smooth, rich, and full of flavor, yet completely sugar-free and made without an oven.
Imagine a luscious layer of creamy filling nestled between light, crumbly crusts made with wholesome, low-carb ingredients — all chilled to perfection. Whether you’re diabetic, watching your sugar intake, or simply embracing a healthier lifestyle, this no-bake cake allows you to indulge without guilt. It’s proof that you don’t need refined sugar or flour to create a dessert that’s as satisfying as it is stunning.
Why You’ll Love This Diabetic-Friendly No-Bake Creamy Cake
What makes this cake truly irresistible is its perfect balance of flavor, texture, and nutrition. It’s rich and creamy like a cheesecake but much lighter and quicker to prepare. There’s no baking required — just simple mixing, layering, and chilling. It’s a stress-free dessert that looks elegant enough for special occasions yet simple enough for everyday enjoyment.
No oven needed — ideal for hot days or quick dessert prep.
Low-carb and sugar-free — perfectly suited for diabetics or anyone on a keto-friendly diet.
Creamy, velvety texture — without the heaviness of traditional cheesecake.
Make-ahead dessert — it sets beautifully in the fridge and tastes even better the next day.
Customizable — easily adjust flavors, toppings, or crust ingredients to match your taste or dietary preferences.
Ingredients and Their Roles
Every ingredient in this no-bake diabetic cake has been thoughtfully chosen to deliver taste, texture, and nutrition without spiking blood sugar. Let’s break down what you’ll need and why.
For the Crust
1 ½ cups almond flour — a perfect low-carb, gluten-free alternative to traditional flour that adds nutty flavor and a soft, crumbly texture.
2 tablespoons unsweetened shredded coconut — adds a light sweetness and texture without sugar.
3 tablespoons melted butter — helps bind the crust together and gives it richness.
1 tablespoon erythritol or monk fruit sweetener — a natural, zero-calorie sweetener that adds gentle sweetness without affecting blood sugar.
½ teaspoon cinnamon (optional) — enhances the aroma and depth of flavor, pairing beautifully with the almond and coconut.
For the Creamy Filling
8 oz (225 g) cream cheese, softened — forms the creamy, rich base of the cake. Use full-fat for the best texture and flavor.
1 cup Greek yogurt (unsweetened) — adds tanginess, creaminess, and protein while keeping the filling light.
½ cup heavy cream or coconut cream — helps achieve that luxurious, silky consistency.
⅓ cup powdered erythritol or allulose — provides the sweetness you crave without sugar’s effects.
1 teaspoon pure vanilla extract — enhances the flavor and rounds out the sweetness.
1 tablespoon gelatin powder (optional) — helps the filling set perfectly, giving structure to the cake without baking.
3 tablespoons warm water (for blooming gelatin) — used to dissolve the gelatin evenly into the mixture.
Optional Toppings
Fresh berries — such as raspberries, blueberries, or strawberries for natural sweetness and antioxidants.
Unsweetened cocoa powder or grated dark chocolate (85%+) — adds a rich, slightly bitter contrast to the creamy base.
Toasted nuts — almonds, pecans, or walnuts for crunch and heart-healthy fats.
Step-by-Step Instructions
Step 1: Prepare the Crust
In a medium bowl, combine the almond flour, unsweetened coconut, sweetener, and cinnamon (if using). Pour in the melted butter and mix until the mixture resembles wet sand.
Press this mixture firmly into the bottom of a springform pan (about 8 inches in diameter) lined with parchment paper. Use the back of a spoon to smooth and compact the crust evenly. Place the crust in the refrigerator to chill while you prepare the filling.
Step 2: Prepare the Creamy Filling
In a large mixing bowl, beat the cream cheese until smooth and lump-free. Add the Greek yogurt, sweetener, and vanilla extract. Beat again until fully combined and fluffy.
In a separate bowl, whip the heavy cream (or coconut cream) until soft peaks form, then gently fold it into the cream cheese mixture.
If you’re using gelatin, sprinkle it over the warm water and let it bloom for a minute. Then microwave for about 10 seconds until dissolved. Stir the gelatin mixture into the creamy filling and mix thoroughly to ensure even distribution.
Step 3: Assemble the Cake
Pour the creamy filling over the prepared crust. Use a spatula to spread it evenly and smooth the top. Tap the pan lightly on the counter to remove air bubbles.
Cover with plastic wrap or a lid and refrigerate for at least 4 to 6 hours, or ideally overnight. This chilling process allows the cake to set beautifully and enhances the flavors.
Step 4: Decorate and Serve
Once the cake is fully set, remove it from the fridge and release it gently from the springform pan. Decorate the top with fresh berries, a dusting of unsweetened cocoa, or a sprinkle of chopped nuts.
Slice carefully using a sharp knife, wiping the blade between cuts for clean slices. Serve chilled and enjoy a creamy, satisfying dessert that’s as good for your taste buds as it is for your health.
Why This Cake Is Loved by Everyone
This Diabetic-Friendly No-Bake Creamy Cake is a crowd-pleaser because it doesn’t taste like a “healthy” dessert — it tastes like pure indulgence. Its creamy filling melts in your mouth, the crust adds a delicate nutty crunch, and every bite satisfies that craving for something sweet and rich. Best of all, it keeps your blood sugar stable, so you can enjoy dessert without worry.
Even non-diabetics love it because it’s light, refreshing, and not overly sweet. It’s ideal for family gatherings, dinner parties, or meal prep desserts during the week. Once you make it, you’ll find yourself returning to this recipe again and again because of how effortlessly delicious it is.
Pro Tips for Perfecting Your No-Bake Creamy Cake
Use room temperature ingredients — Cream cheese and yogurt mix more smoothly when not cold, preventing lumps.
Don’t skip chilling time — The cake needs several hours to firm up properly and develop its full creamy texture.
Taste and adjust sweetness — Depending on your preferred sweetener, you might want to add a bit more or less. Taste before setting it in the fridge.
Choose your sweetener wisely — Erythritol and monk fruit are great choices. Avoid artificial sweeteners that can add bitterness.
Line your pan — Parchment paper makes it easy to release the cake without sticking.
Add flavor variations — Mix in lemon zest for brightness, cocoa for a chocolate version, or instant coffee for a mocha twist.
Serving Suggestions
Serve this creamy no-bake cake chilled, straight from the refrigerator. For a touch of elegance, garnish each slice with:
A few fresh berries and a mint leaf
A light drizzle of sugar-free chocolate syrup
A dollop of unsweetened whipped cream
A sprinkle of crushed nuts for texture
Pair it with a cup of freshly brewed coffee or herbal tea for the ultimate guilt-free dessert experience. It’s perfect for afternoon treats, post-dinner indulgence, or as a celebration dessert for birthdays and holidays.
Nutrition and Health Benefits
This dessert isn’t just delicious — it’s nutrient-conscious. Thanks to the almond flour and Greek yogurt, you’re getting a healthy dose of protein, good fats, and fiber. These ingredients help slow digestion and stabilize blood sugar levels, making this a smart dessert choice for diabetics or anyone managing carbohydrate intake.
Almond flour — Low in carbs, rich in healthy fats and magnesium.
Greek yogurt — Packed with probiotics and protein for gut and muscle health.
Sweeteners like erythritol or monk fruit — Don’t affect insulin levels or cause sugar spikes.
Berries — Add natural antioxidants and vitamins without excess sugar.
Each serving provides creamy satisfaction while keeping your nutrition goals intact — a rare combination that makes this recipe stand out among other diabetic-friendly desserts.
Storage and Make-Ahead Tips
Refrigerate — Store the cake covered in the fridge for up to 5 days.
Freeze — For longer storage, freeze individual slices wrapped tightly. Thaw in the fridge overnight before serving.
Make ahead — Prepare it a day in advance for special events. The flavors actually improve after a full day of chilling.
Conclusion: Indulgence Without Compromise
This Diabetic-Friendly No-Bake Creamy Cake is the ultimate proof that healthy desserts can be luxurious, flavorful, and satisfying. With its silky-smooth filling, crunchy nutty crust, and no-bake simplicity, it’s the kind of dessert that impresses everyone — whether they follow a low-sugar lifestyle or not.
Make it once, and it will become a staple in your kitchen. It’s easy to customize, simple to prepare, and most importantly, completely guilt-free. Every spoonful delivers creamy comfort and sweet satisfaction without ever compromising your health.
Try it today and discover how delicious a sugar-free life can be. You’ll never look at “diabetic-friendly desserts” the same way again.
Deprecated: preg_split(): Passing null to parameter #3 ($limit) of type int is deprecated in /home/seariivx/carwom.com/wp-content/themes/jannah/framework/functions/post-functions.php on line 863