Recipes Homemade Musketeer Candy Bar
Deprecated: preg_split(): Passing null to parameter #3 ($limit) of type int is deprecated in /home/seariivx/carwom.com/wp-content/themes/jannah/framework/functions/post-functions.php on line 863
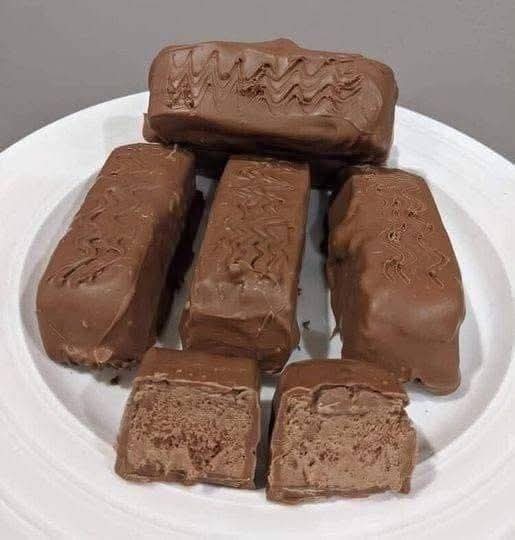
Homemade Musketeer Candy Bar Recipe – Light, Fluffy, and Chocolatey
Indulge your sweet tooth with this Homemade Musketeer Candy Bar recipe! Imagine biting into a light, airy nougat center enveloped in silky smooth chocolate, just like the iconic 3 Musketeers candy bar you cherished as a child. This recipe brings that nostalgic treat right into your kitchen, allowing you to enjoy a delicious homemade version that rivals, and may even surpass, store-bought candy bars.
The Nostalgic Appeal of Musketeer Candy Bars
The 3 Musketeers bar has been a childhood favorite for decades, known for its light, fluffy nougat and smooth chocolate coating. Many remember unwrapping this candy bar at lunch, enjoying its airy texture that melts instantly in the mouth. Making these bars at home not only captures that classic flavor but also adds the satisfaction of crafting a candy entirely from scratch. You control the quality of ingredients, the chocolate coating, and the size of each bar.
This homemade version also allows for customization, whether you want a thicker chocolate coating, a hint of vanilla or almond in the nougat, or even miniature bars perfect for gifting and special occasions.
Why You’ll Love Making Homemade Musketeer Candy Bars
- Authentic Flavor: Recreates the classic 3 Musketeers bar with real, high-quality ingredients.
- Light and Airy Texture: Whipped egg white nougat ensures each bite is soft, fluffy, and melts in your mouth.
- Customizable: Adjust chocolate type, add flavors, or shape the bars to your liking.
- Perfect for Gifting: Homemade candy bars are thoughtful, personal, and sure to impress friends and family.
- Fun to Make: Crafting your own candy bars is a rewarding kitchen experience, especially with kids or for holiday baking.
Ingredients and Their Roles
Each ingredient has a crucial role in achieving the perfect candy bar:
1. Granulated Sugar (1 cup)
Provides the base sweetness and structure for the nougat. It’s essential to cook sugar to the correct stage for a stable, chewy nougat texture.
2. Light Corn Syrup (1/4 cup)
Prevents crystallization and keeps the nougat smooth and pliable. Corn syrup ensures the texture is elastic and soft rather than grainy.
3. Water (1/4 cup)
Dissolves the sugar and corn syrup to create a uniform syrup for cooking. It helps regulate the temperature during the candy-making process.
4. Egg White (1 large)
Whipped to stiff peaks, the egg white incorporates air into the nougat, giving it the iconic light and fluffy texture that defines Musketeer candy bars.
5. Pinch of Salt
Balances sweetness and enhances all the flavors. Even a small amount of salt can elevate the nougat’s overall taste.
6. Vanilla Extract (1 tsp)
Adds warmth and depth to the flavor. Vanilla complements both the nougat and chocolate coating, creating a classic candy flavor.
7. Chocolate (6–8 ounces)
Choose high-quality semisweet or milk chocolate for coating the nougat bars. Chocolate provides the silky, smooth exterior that makes each bite indulgent and satisfying.
Understanding the purpose of each ingredient is key to creating perfectly textured, flavorful, and visually appealing candy bars.
Step-by-Step Instructions for Homemade Musketeer Candy Bars
Step 1: Prepare the Pan
- Line an 8×8-inch baking dish with parchment paper, leaving an overhang on the sides to lift the nougat easily once set.
- This ensures a smooth release and prevents sticking, giving you clean, professional-looking candy bars.
Step 2: Make the Sugar Syrup
- In a medium saucepan, combine 1 cup granulated sugar, 1/4 cup light corn syrup, and 1/4 cup water.
- Stir gently over medium heat until the sugar fully dissolves. Avoid stirring after it starts boiling to prevent crystallization.
Step 3: Cook to the Hard Ball Stage
- Attach a candy thermometer to the saucepan. Heat the syrup to 250°F (121°C), also known as the hard ball stage.
- Remove from heat immediately once it reaches this temperature. Overcooking can make the nougat too hard and brittle.
Expert Tip: Keep an eye on the syrup at all times. Candy-making is precise — even a few degrees difference can affect the texture of the nougat.
Step 4: Whip the Egg White
- While the syrup is heating, whip 1 large egg white with a pinch of salt in a clean, grease-free bowl until stiff peaks form.
- Stiff peaks ensure the nougat will be light and airy, giving each candy bar that signature melt-in-your-mouth texture.
Expert Tip: Make sure no yolk or grease gets into the egg white, as this can prevent proper whipping and affect the final texture.
Step 5: Combine Syrup and Egg White
- With the mixer on low speed, slowly pour the hot syrup into the whipped egg white in a thin, steady stream.
- Gradually increase the speed to medium-high and continue whipping until the mixture becomes thick, glossy, and holds its shape.
- Add 1 teaspoon vanilla extract for flavor and fold gently to incorporate.
Expert Tip: Pouring the syrup slowly prevents the egg white from cooking too quickly and ensures a smooth, elastic nougat base. This step is crucial for creating a light, fluffy texture.
Step 6: Transfer the Nougat to the Pan
- Immediately pour the nougat mixture into the prepared pan.
- Use a spatula or slightly oiled hands to smooth the surface evenly.
- Let it cool at room temperature for at least 1–2 hours until firm but still slightly pliable.
Expert Tip: Avoid refrigerating the nougat at this stage, as cold temperatures can make it too hard to work with when cutting and coating with chocolate.
Step 7: Cutting the Nougat
- Once the nougat has cooled and set at room temperature, lift it gently from the pan using the parchment overhang.
- Place it on a cutting board lightly dusted with powdered sugar to prevent sticking.
- Use a sharp serrated knife to cut into bars of your desired size, typically 1 inch wide and 4 inches long for traditional candy bars.
Expert Tip: Dip the knife in hot water or lightly oil it before each cut to achieve clean edges without tearing the nougat.
Step 8: Coating with Chocolate
- Melt 6–8 ounces of high-quality chocolate using a double boiler or microwave in short intervals, stirring frequently.
- Dip each nougat bar into the melted chocolate, ensuring it is fully coated.
- Place the coated bars on a parchment-lined tray and allow the chocolate to set at room temperature.
Expert Tip: For a glossy finish, temper the chocolate properly or add a small amount of vegetable oil to the melted chocolate to enhance shine and smoothness.
Step 9: Decorating and Customizing
- Sprinkle toppings such as crushed nuts, sea salt, or edible glitter on the chocolate before it sets.
- Drizzle with white or dark chocolate for a decorative contrast.
- Experiment with flavors by adding a few drops of almond, coffee, or orange extract to the nougat before setting.
Step 10: Storing Homemade Musketeer Bars
- Store in an airtight container at room temperature for up to 2 weeks.
- Separate layers with parchment or wax paper to prevent sticking.
- For long-term storage, wrap individual bars in wax paper and place in a freezer-safe container. Freeze for up to 2 months and thaw at room temperature before serving.
Step 11: Serving Suggestions
- Enjoy these candy bars on their own as a nostalgic treat.
- Pair with cold milk for a classic candy bar experience.
- Serve alongside coffee, hot chocolate, or tea for an indulgent afternoon snack.
- Include in dessert platters for parties or family gatherings.
Step 12: Gift Ideas
- Wrap individual bars in decorative wax paper or cellophane and tie with ribbons for homemade gifts.
- Package in small boxes lined with parchment for a professional presentation.
- Personalize with handwritten tags or labels for birthdays, holidays, or special occasions.
Conclusion – Why Homemade Musketeer Candy Bars are Irresistible
Creating your own Musketeer Candy Bars allows you to enjoy a nostalgic treat while controlling the quality and flavor of each ingredient. With a light, airy nougat center, silky chocolate coating, and endless customization options, these bars are perfect for indulging yourself, gifting to loved ones, or impressing guests at any gathering.
The satisfaction of making candy from scratch, combined with the delectable texture and flavor, makes this recipe a must-try for any home baker. By following these detailed steps and tips, you can recreate a classic favorite that is soft, fluffy, and decadently chocolatey — a true homemade delight that will delight everyone who tries it
Deprecated: preg_split(): Passing null to parameter #3 ($limit) of type int is deprecated in /home/seariivx/carwom.com/wp-content/themes/jannah/framework/functions/post-functions.php on line 863